How to Migrate from Mailchimp to Klaviyo (Step-by-Step)
Most ecommerce brands leave money on the table when they migrate platforms. You've decided Klaviyo offers better segmentation, deeper analytics, and stronger automation. Good call. Over 193,000 businesses now use Klaviyo to drive revenue growth, and those who switch from Mailchimp often see immediate gains.

But here's what matters: the actual migration. Get it wrong and you'll lose engagement data, botch your automations, or tank your deliverability.
This guide walks through the exact process. You'll connect both platforms, transfer your subscriber information, rebuild your email templates, and recreate your automations as Klaviyo flows. No guesswork, no data loss.
We'll cover pre-migration planning, the technical integration using your Mailchimp integration API key, how to sync contacts without losing engagement history, and the proper way to rebuild flows that actually convert. By the end, you'll have a clean migration and a Klaviyo account that performs from day one.
Why Switch from Mailchimp to Klaviyo?
Mailchimp works fine for basic campaigns. But ecommerce brands quickly hit its limits.
Klaviyo was purpose-built for online retail. The platform tracks customer behaviour across your entire site, pulls in order data automatically, and builds segments based on actual purchase patterns. Mailchimp's audiences can't match that depth.
The ROI difference shows up fast. Email marketing delivers £36–£45 in revenue for every £1 spent in 2026, and Klaviyo's automation capabilities push that even higher. Their flows trigger based on real-time customer actions, not just list membership.

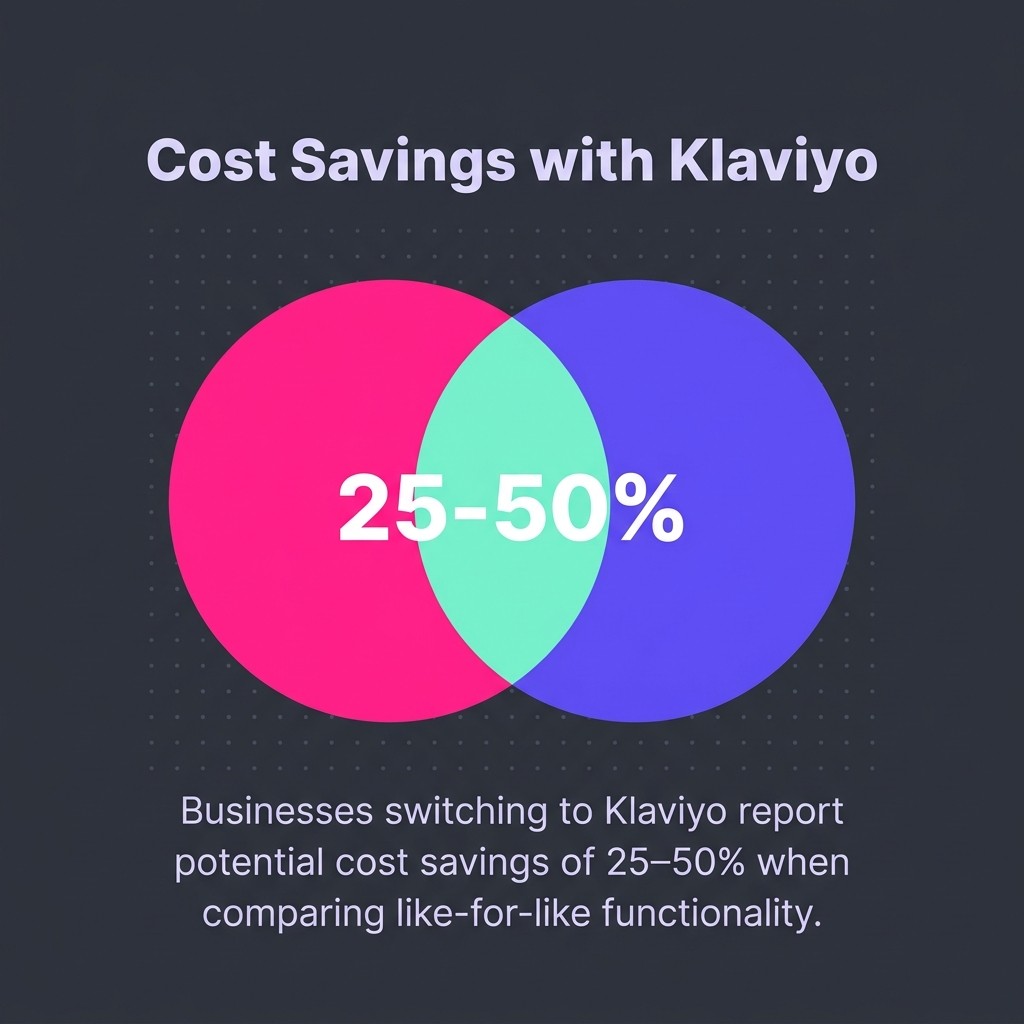
Pricing deserves an honest look. Mailchimp appears cheaper at first glance. But once you add ecommerce features, advanced segmentation, and proper automations, the cost climbs. Businesses switching to Klaviyo report potential cost savings of 25–50% when comparing like-for-like functionality.
The segmentation alone justifies the move. Klaviyo lets you build audiences based on predicted lifetime value, purchase frequency, product preferences, and dozens of other ecommerce-specific metrics. Try doing that with Mailchimp tags.
Then there's the data. Klaviyo shows which emails drive purchases, not just opens. You see revenue per recipient, conversion rates by segment, and actual customer lifecycle metrics. That visibility changes how you approach retention.
Before You Begin: Prerequisites and Preparation
Poor planning kills migrations. Most problems trace back to skipping setup steps.
Start with a full audit of your current Mailchimp account. Document every audience, segment, automation, and template you're using. If it's not written down, you'll forget to migrate it.
Plan for 4–8 weeks to complete the migration properly. Rushing creates gaps in your data or breaks your automations mid-campaign.

Export Your Mailchimp Data
Back up everything before touching any integration settings. Mailchimp lets you export subscriber lists, but you need to capture engagement data separately.
Export each audience as a CSV. Include all custom fields, tags, and subscription dates. Save these files somewhere safe, you'll need them if anything goes wrong.
Document your current automations in detail. Screenshot the flow logic, timing delays, and email content. Klaviyo's flow builder works differently, so you'll need these as reference when rebuilding.
Clean Your Lists Now
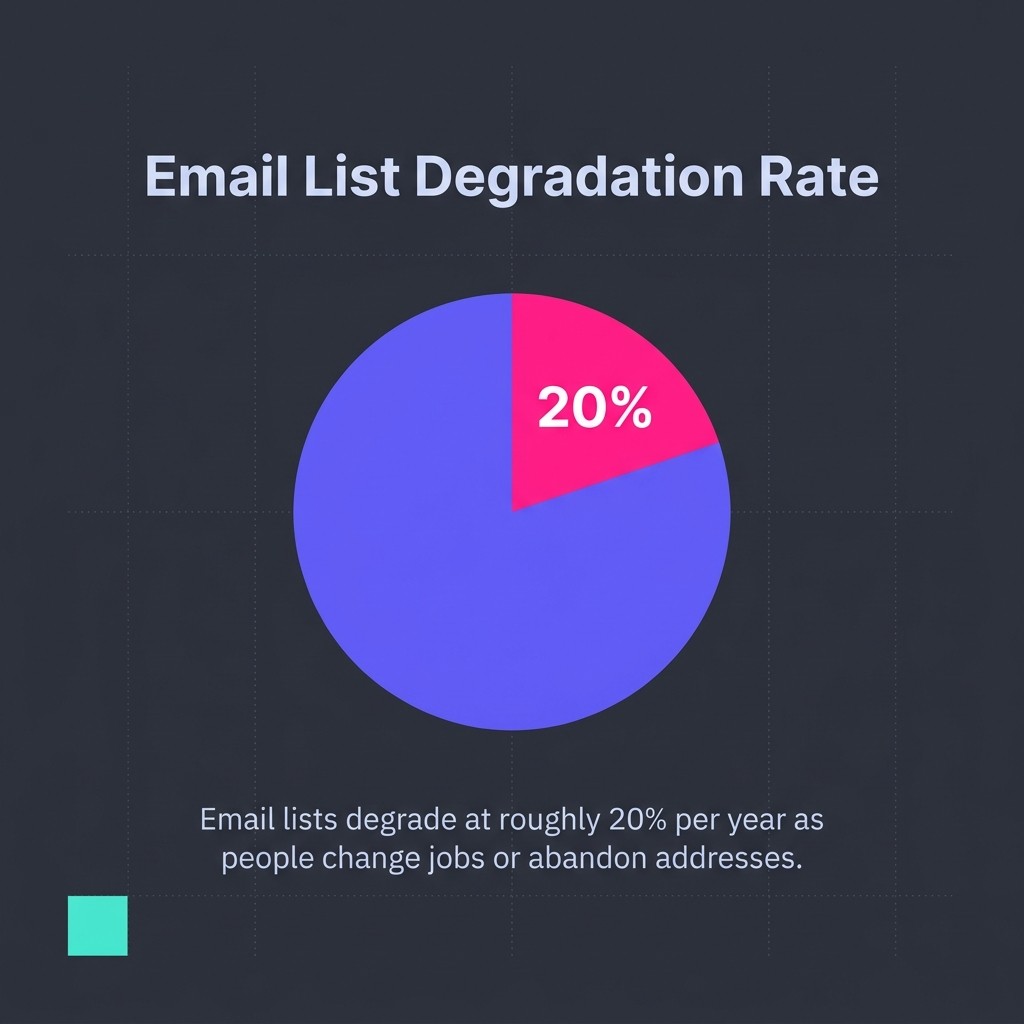
Migration is the perfect time to scrub dead contacts. Email lists degrade at roughly 20% per year as people change jobs or abandon addresses.
Remove anyone who hasn't opened an email in 6–12 months. Yes, it shrinks your list. But you'll improve deliverability and save money on Klaviyo's contact-based pricing.
Check for duplicate emails, invalid addresses, and role accounts (info@, admin@). Clean data migrates better and performs stronger.
Set Up Your Klaviyo Account
Create your Klaviyo account if you haven't already. Choose the plan that matches your contact count after cleaning.

Configure your sender domain and email authentication. SPF, DKIM, and DMARC protocols are essential for deliverability. Set these up before migrating any contacts.
The authentication process takes 24–48 hours for DNS records to propagate. Start early or you'll be waiting with a half-migrated account.
Step 1: Connect Your Ecommerce Platform to Klaviyo
This step comes first. Your ecommerce integration feeds Klaviyo the purchase data that powers its best features.
If you're on Shopify, the integration takes about 5 minutes. Navigate to Klaviyo's integrations page, select Shopify, and authorise the connection. Klaviyo immediately starts syncing your product catalogue and order history.
For WooCommerce or other platforms, you'll install a plugin or add tracking code. Follow Klaviyo's platform-specific integration guides exactly as written.
Why This Matters
Your ecommerce platform connection gives Klaviyo access to purchase behaviour, product views, and cart activity. Without this data flowing, you can't build the segments or Klaviyo flows that make the platform worthwhile.
The integration also creates customer profiles automatically. When someone places an order, Klaviyo merges that purchase data with their email engagement history. This unified view drives better targeting.
Disconnect Mailchimp from Your Store
Running two email platforms simultaneously causes problems. Contacts receive duplicate campaigns, data syncs conflict, and you can't track which platform drives results.
Disable your Mailchimp integration before activating Klaviyo. This prevents double-sending and ensures clean data attribution.
Don't delete your Mailchimp account yet. Keep it accessible until you've verified everything migrated correctly.
Step 2: Integrate Mailchimp with Klaviyo Using Your API Key
Klaviyo's Mailchimp integration pulls your subscriber data directly. This is cleaner than manual CSV uploads.
You'll need your Mailchimp API key. Log into Mailchimp, go to Account Settings, then Extras, and select API keys. Generate a new key specifically for this migration.
Copy that API key. In Klaviyo, navigate to Integrations, find Mailchimp, and paste the key when prompted. Click Connect.
Configure the Data Sync
Klaviyo asks which Mailchimp audiences to sync. Select all active lists you want to migrate. Leave archived or test lists unchecked.
The integration automatically maps standard fields (email, name, phone). Custom Mailchimp merge tags become custom properties in Klaviyo. Review the mapping to ensure critical data transfers correctly.
Start the sync. Depending on your list size, this takes anywhere from minutes to several hours. With 13 million total Mailchimp users, their API sometimes runs slow during peak hours.
What Gets Transferred
The Mailchimp integration syncs your subscriber information including email addresses, names, custom fields, and subscription status. It also pulls engagement data for opens, clicks, and email receives from recent campaigns.
What doesn't transfer: campaign content, automation workflows, and email templates. You'll rebuild those manually.
Unsubscribed contacts sync to Klaviyo's suppression list automatically. Bounced contacts also transfer, protecting your sender reputation from the start.
Step 3: Review and Verify Your Synced Contact Data
Data migrations fail silently. Always verify what actually transferred.
Check your Klaviyo lists against your Mailchimp export CSVs. Compare total contact counts first. If numbers don't match, identify which segments or audiences didn't sync.
Spot-check individual profiles. Open 10–20 random contacts in Klaviyo and verify their custom properties populated correctly. Look for missing fields, truncated data, or formatting issues.
Verify Engagement History
Klaviyo imports recent engagement metrics from Mailchimp. Check that open and click data appears in your contacts' activity timelines.
This engagement history matters for segmentation. You'll use it to identify your most responsive subscribers and exclude non-openers from certain Klaviyo flows.
If engagement data looks incomplete, the Mailchimp integration might need time to backfill. Wait 24 hours and check again.
Handle Suppression Lists Properly
Your Mailchimp unsubscribes must carry over. Emailing someone who opted out violates regulations and tanks your sender reputation.
Klaviyo's integration handles this automatically, adding unsubscribed and bounced contacts to your suppression list. But verify it worked. Export your Klaviyo suppression list and compare it to Mailchimp's unsubscribed contacts.
Any gaps mean someone could receive unwanted emails. Fix discrepancies immediately by manually adding missing suppressions.
Step 4: Import Mailchimp Tags as Custom Properties
Mailchimp tags organise contacts. Klaviyo uses custom properties instead.
The integration converts most tags automatically, creating a custom property for each one. Check your Klaviyo contact properties to see what transferred.
Some complex tag structures need manual mapping. If you used tags to track purchase history, VIP status, or customer segments, verify those translated correctly into Klaviyo's property system.
Build Segments from Your Properties
Now recreate your Mailchimp segments using Klaviyo's segmentation tool. The logic is more powerful but requires rebuilding.
For each Mailchimp segment, note the conditions you used. Then create an equivalent Klaviyo segment using custom properties, engagement metrics, or purchase behaviour.
Klaviyo segments update in real-time. Unlike Mailchimp audiences, you don't manually add or remove people. The segment automatically includes anyone who matches your conditions.
Test each segment after creation. Compare the contact count to your Mailchimp equivalent. Significant differences indicate your conditions need adjustment.
Step 5: Migrate Your Email Templates
Templates don't transfer automatically. You'll rebuild each one in Klaviyo's email builder.
Export your Mailchimp templates as HTML. In Mailchimp, open each template, go to the template editor, and select "Export as HTML". Save these files.
In Klaviyo, create new email templates using their drag-and-drop builder. For simple designs, recreating them visually is faster than importing HTML.
Handle Template Tags and Personalisation
Mailchimp and Klaviyo use different syntax for personalisation tags. Mailchimp's merge tags look like *|FNAME|*, whilst Klaviyo uses {{ first_name }}.
If you import HTML templates, find and replace all Mailchimp merge tags with Klaviyo equivalents. Miss one and your emails send with broken placeholders.
Test every template before using it in a campaign. Send test emails to yourself and check that personalisation works, images load, and links function correctly.
Optimise for Klaviyo's Features
Whilst rebuilding templates, add features Mailchimp couldn't handle. Product recommendations, dynamic content blocks, and conditional sections all work natively in Klaviyo.
Don't just copy your old designs. Improve them using Klaviyo's ecommerce-specific template blocks.
Step 6: Recreate Your Automations as Klaviyo Flows
This is where Klaviyo truly outperforms Mailchimp. Flows trigger based on real customer behaviour, not just list actions.
Review your documented Mailchimp automations. Identify which ones drove revenue and which underperformed. Migrate the winners, improve or drop the rest.
Abandoned cart automations alone generate £3.07 revenue per recipient on average. Start with high-impact flows first.
Map Mailchimp Automations to Klaviyo Flows
Common Mailchimp automations translate directly to Klaviyo flows. Welcome series, abandoned cart, post-purchase, and win-back sequences all have Klaviyo equivalents.
But Klaviyo's trigger options are richer. Instead of "joins a list", you can trigger flows when someone views a specific product, hits a price threshold, or abandons checkout at a particular step.
Rebuild each automation using Klaviyo's flow builder. Add your migrated email templates, set timing delays, and configure trigger conditions.
Welcome Flow Setup
Your welcome series is critical. Welcome emails generate open rates above 80%, making them your best opportunity to convert new subscribers.
Create a Klaviyo flow triggered by "Subscribed to List". Add 3–5 emails spaced over 7–14 days. Each email should provide value whilst guiding subscribers towards their first purchase.
Include your best-performing product recommendations and a first-purchase discount if that aligns with your strategy.
Abandoned Cart Flow Migration
Set up your abandoned cart flow to trigger when someone "Started Checkout" but hasn't "Placed Order". Add a time delay of 2–4 hours for the first email.
Most effective sequences send 3 emails: one reminder, one with social proof or urgency, and a final email with an incentive if needed.
Klaviyo automatically pulls abandoned cart items into your emails using dynamic product blocks. This beats Mailchimp's limited ecommerce features.
Post-Purchase and Repeat Customer Flows
Build flows that trigger after someone places an order. Send a thank-you email immediately, a review request after 7–14 days, and a replenishment reminder based on your product's usage cycle.
For repeat customers, create flows that recognise second purchases, reward loyalty, and cross-sell complementary products based on past orders.
These lifecycle flows didn't exist in most Mailchimp setups because the platform lacks robust purchase tracking. Klaviyo makes them standard.
Step 7: Rebuild Sign-Up Forms in Klaviyo
Your Mailchimp forms stop working once you disconnect the integration. Replace them with Klaviyo forms before going live.
Klaviyo offers embedded forms, pop-ups, and flyouts. Choose formats that match your current sign-up strategy.
Copy your existing form design and messaging. Keep the same value proposition, incentive, and field requirements. Changing too much during migration skews your performance data.
Form Placement and Testing
Install Klaviyo forms in the same locations as your old Mailchimp forms. Footer sign-ups, homepage pop-ups, and exit-intent overlays should all move to Klaviyo.
Test each form thoroughly. Submit test sign-ups, verify they appear in your Klaviyo lists, and confirm welcome flows trigger correctly.
Most form issues trace back to incorrect list assignments or trigger conditions. Double-check your settings before launching.
Step 8: Warm Your Domain and Monitor Deliverability
Even with proper authentication, switching platforms affects deliverability. Inbox providers treat your Klaviyo sends as new traffic.
Start with a warm-up period. Send to your most engaged segments first, gradually increasing volume over 2–3 weeks.
Monitor your open rates, spam complaints, and bounce rates closely. Sudden drops indicate deliverability problems that need immediate attention.
Segment for Warm-Up
Create segments based on recent engagement. Send your first Klaviyo campaigns only to contacts who opened or clicked in the last 30 days.
After a week of strong performance, expand to 60-day engaged contacts. Then 90 days. This gradual approach builds sender reputation without triggering spam filters.
Avoid blasting your entire list immediately. That's how brands land in spam folders and stay there.
Step 9: Test Everything Before Sunsetting Mailchimp
Don't cancel Mailchimp until you've verified Klaviyo works perfectly.
Run parallel systems for 2–4 weeks. Send campaigns from Klaviyo whilst keeping Mailchimp accessible as backup.
Test every critical flow: welcome series, abandoned cart, post-purchase, and win-back. Place test orders, abandon test carts, and subscribe with test emails to trigger each flow.
Performance Comparison
Track your first month of Klaviyo campaigns against your Mailchimp benchmarks. Compare open rates, click-through rates, and revenue per recipient.
Most brands see improvements immediately because Klaviyo's segmentation delivers more relevant content. If performance drops, investigate your segment logic or template design.
Final Mailchimp Shutdown
Once you're confident everything works, export one final backup of your Mailchimp data. Save all audience exports, automation screenshots, and template HTML.
Then downgrade your Mailchimp account to the free tier or cancel entirely. Keep your login credentials accessible for a few months in case you need to reference old campaign data.
Update any third-party tools or integrations that connected to Mailchimp. Point them to Klaviyo instead, or disconnect them if they're no longer needed.
What to Expect After Migration
The first 30 days reveal whether your migration succeeded. Watch your key metrics closely.
Klaviyo's analytics show deeper insights than Mailchimp offered. You'll see revenue attribution by flow, segment performance, and predicted customer lifetime value. Use these metrics to optimise your retention strategy.
Most brands discover segments or flows that underperform. That's normal. Klaviyo gives you the tools to test variations, adjust timing, and improve results systematically.
If you need help optimising your new Klaviyo setup, our Klaviyo specialists can audit your account and identify quick wins.
Migration is just the start. The real value comes from using Klaviyo's advanced features to build better customer relationships and drive more repeat purchases. That's when retention becomes truly inevitable.