Klaviyo Tutorial: Zero to Revenue in 30 Days
Most ecommerce brands spend months tinkering with Klaviyo before they see meaningful revenue. That's backwards.
The platform is built to generate revenue from day one, not three months down the line. The difference between brands that make email marketing work and those that don't comes down to setup priorities. Focus on the wrong features first, and you'll burn time building things that don't move the needle. Get the sequence right, and you'll see revenue in your first week.
We've watched hundreds of brands launch Klaviyo accounts. The ones that hit revenue fastest follow a specific implementation order. They skip the bells and whistles. They build three core flows, connect their store properly, and let automation handle the heavy lifting whilst they focus on growing their list.
This tutorial walks you through that exact sequence. You'll set up your account correctly from the start, integrate your ecommerce platform, build the three flows that generate the most revenue, and create the signup forms that grow your list. No fluff, no feature creep, just the straight path from setup to revenue.
Getting Started with Klaviyo: The Foundation That Matters
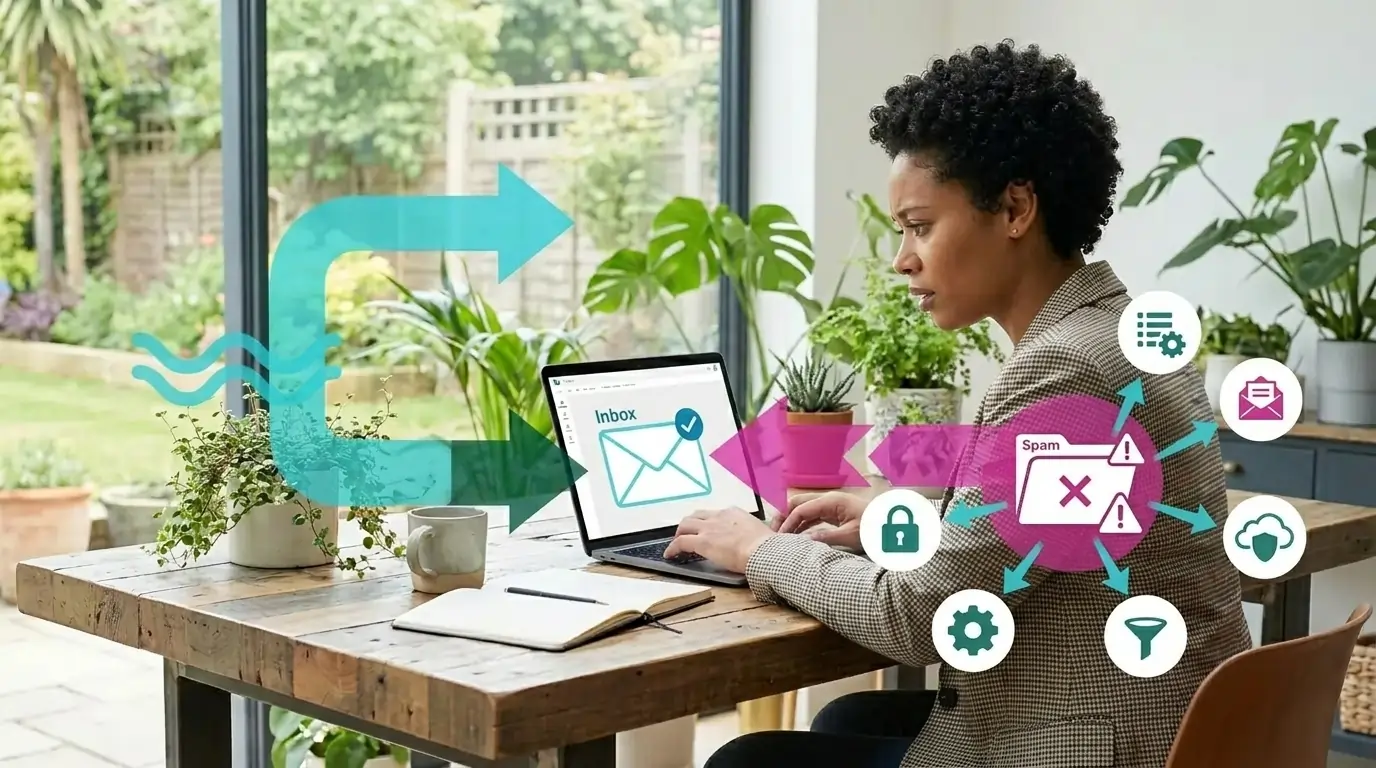
Klaviyo is a customer data platform built specifically for ecommerce brands. It connects your store data to email marketing automation, letting you send behaviour-triggered messages that generate revenue whilst you sleep.
But here's what trips up most brands: they treat Klaviyo like a basic email tool. They focus on campaign design and template aesthetics before building the automated flows that actually drive revenue. That's why their first 30 days produce minimal results.
The platform works by tracking every action your customers take. Browse a product, add to cart, make a purchase, click an email. Klaviyo captures all of it and uses that data to trigger automated email sequences that respond to customer behaviour in real time.
Why Email Marketing Still Delivers
Email isn't dead. It's still the highest-performing marketing channel for ecommerce brands. According to recent industry analysis, email marketing delivered £36 to £45 in return for every £1 spent in 2026.

The reason? Email subscribers show purchase intent. They've actively chosen to hear from your brand. That makes them 2-3 times more valuable than customers acquired through other channels.
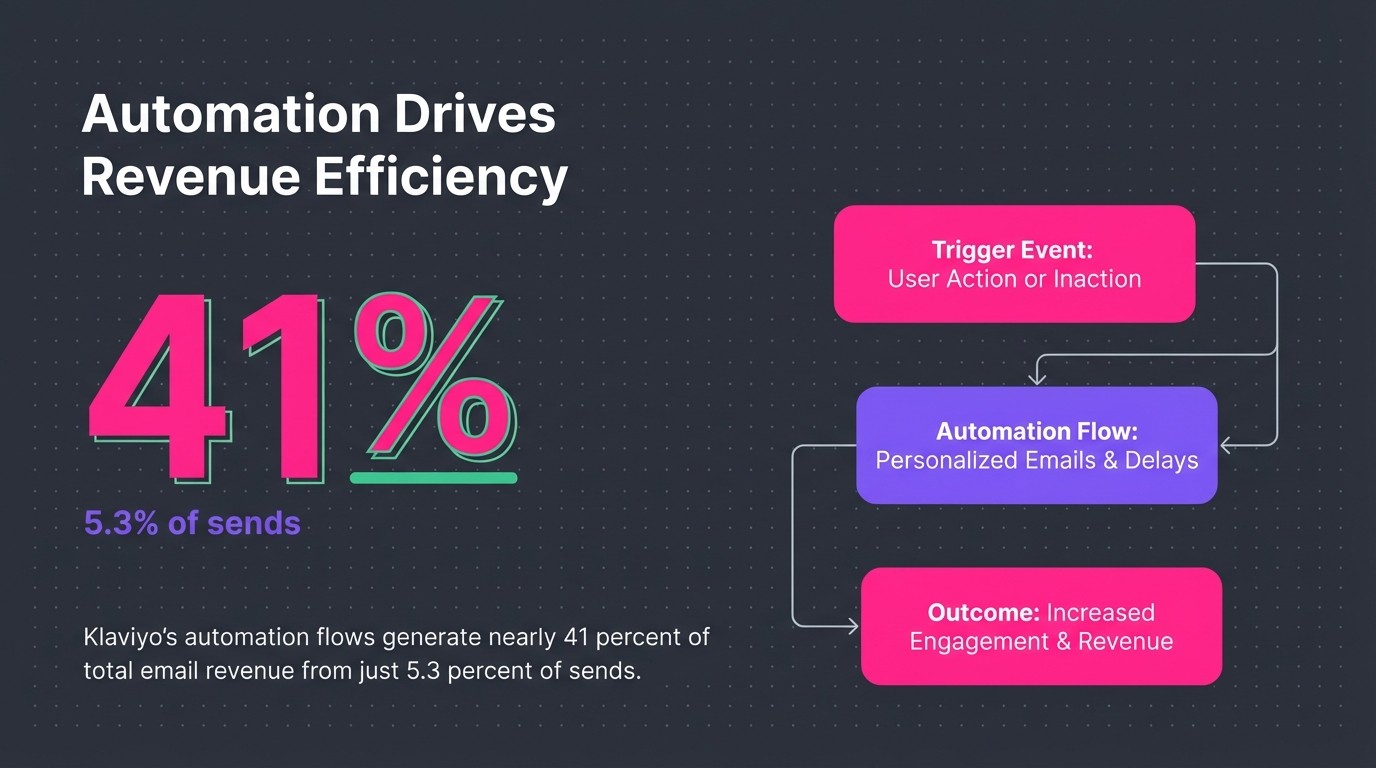
But raw email sending won't get you those results. You need automation. Klaviyo's automation flows generate nearly 41 percent of total email revenue from just 5.3 percent of sends. That's the power of behaviour-triggered messaging.
What Makes Klaviyo Different
Most email platforms let you send campaigns. Klaviyo does that too, but its real strength lies in three areas: customer data integration, behavioural automation, and revenue attribution.
First, it pulls product data, purchase history, and browsing behaviour directly from your ecommerce store. That means you can segment customers based on what they've actually bought, not just generic demographics.
Second, it automates sequences based on those behaviours. Someone abandons their cart? They get a recovery sequence. Someone makes their first purchase? They enter a post-purchase flow designed to drive repeat orders.
Third, it tracks exactly how much revenue each email generates. You can see which flows drive the most value, which campaigns perform best, and where to focus your optimisation efforts.
Connecting Klaviyo to Your Ecommerce Store
Your store integration determines everything else in Klaviyo. Get this right, and the platform automatically syncs customer data, product information, and purchase history. Get it wrong, and you'll spend weeks troubleshooting broken flows and missing data.
Most ecommerce platforms integrate directly with Klaviyo through native connections. Shopify, WooCommerce, BigCommerce, and Magento all have official integrations that take minutes to set up.
The Shopify Integration Process
If you're running Shopify, the integration process is straightforward. Log into your Klaviyo account, navigate to Integrations, and select Shopify from the list. Click "Connect," and you'll be redirected to authorise the connection.
Once connected, Klaviyo starts syncing your customer data immediately. Past purchases flow in first, then product catalogue information, then active customer profiles. This initial sync can take 30 minutes to a few hours depending on your store size.
Here's what the integration automatically tracks:
- Product views and category browsing
- Add-to-cart events and checkout starts
- Purchase completions with full order details
- Customer profile data including email and location
- Product inventory and pricing updates
Verification Steps After Integration
Don't assume the integration worked perfectly. Test it. Place a test order in your store using a fresh email address. Wait five minutes, then check Klaviyo to see if the purchase event appeared in the customer profile.
If the purchase shows up with accurate product details and order value, your integration is working. If not, check your API connection status and make sure you've granted all necessary permissions.
Next, verify your product catalogue synced correctly. Navigate to the Products section in Klaviyo and spot-check a few items. Make sure product names, prices, and image URLs are accurate. If products are missing or data looks wrong, resync your catalogue through the integration settings.
Integration CheckWhat to VerifyWhere to LookCustomer SyncPast purchase history appearsProfiles > Search for existing customerProduct CatalogueAll products with correct pricingContent > ProductsEvent TrackingBrowse and cart events fireActivity Feed in any profile
Setting Up Your Klaviyo Account Properly
Now that your store is connected, you need to configure the account settings that affect email deliverability. Skip these, and your carefully crafted emails land in spam folders instead of inboxes.
Domain authentication is non-negotiable. It proves to inbox providers that you're authorised to send emails from your domain. Without it, your sender reputation suffers and your open rates tank.
Authenticating Your Sender Domain
Navigate to Settings > Email > Sender Information in Klaviyo. You'll see options for sender email address and domain authentication. Click "Authenticate" next to your sending domain.
Klaviyo generates three DNS records: two CNAME records and one TXT record. Copy these records and add them to your DNS settings through your domain registrar. Most common registrars include GoDaddy, Namecheap, and Cloudflare.
DNS changes take 24 to 48 hours to propagate fully. Check back in Klaviyo after 24 hours. If the authentication status shows green, you're set. If it's still pending, wait another day or double-check that you added the records correctly.
Email Warm-Up Strategy
Here's what most brands get wrong: they authenticate their domain, import their entire list, and immediately blast a campaign to everyone. That's how you destroy your sender reputation before you've even started.
When you launch a new email sending account, ISPs treat you as an unknown sender with no track record. They watch your sending patterns closely. Send too much too fast, and they'll flag you as spam.
The solution? Start small and build gradually. The most critical warm-up principle is sending only to your most engaged contacts first. These are customers who've purchased recently or opened emails consistently.

Week one: Send to your 100 most engaged subscribers. Week two: Double it to 200. Week three: 500. Week four: 1,000. This gradual ramp builds positive sending signals with inbox providers.
List Management Essentials
Clean your list before you import it. Remove email addresses that haven't engaged in over a year. Delete obvious spam traps (random character strings, role-based addresses like info@ or admin@). Keep only contacts who've shown interest in the past six months.
Create a segment in Klaviyo called "Engaged Subscribers" using these criteria: opened or clicked an email in the last 90 days, or made a purchase in the last 180 days. This becomes your primary sending audience whilst you warm up your domain.
Creating Your First Email Campaign
Campaigns are one-time sends to specific segments. They're different from flows, which are automated sequences triggered by customer behaviour. You'll use campaigns for promotions, new product launches, and seasonal sales.
But don't build a campaign yet. Seriously. Flows generate far more revenue per send than campaigns do. Build your core flows first, then add campaigns once those automated sequences are running.
When you're ready for your first campaign, start with a simple re-engagement message to your most loyal customers. This low-risk send helps you test deliverability without burning through your entire list.
Building a Campaign Step-by-Step
Click "Campaigns" in the left navigation, then "Create Campaign." Choose "Email" as your campaign type. Give it a clear name that includes the date and purpose, like "March 2026 VIP Early Access."
Select your segment. For your first send, choose that "Engaged Subscribers" segment you created earlier. This ensures high open rates and positive engagement signals.
Design your email using Klaviyo's drag-and-drop editor. Keep it simple. One clear message, one primary call-to-action, mobile-optimised layout. Personalised subject lines double email opens from 16.67 percent to 35.69 percent, so use the recipient's first name or reference their past purchase behaviour.
Subject Line Strategy
Your subject line determines whether anyone reads your carefully crafted email. Make it specific. Make it benefit-driven. Make it personal when possible.
Bad subject line: "New Products Available." Generic, vague, no urgency.
Better subject line: "Sarah, your favourite brand just dropped 12 new styles." Personal, specific, creates curiosity.
Test different approaches. Some audiences respond to urgency ("24 hours left"). Others prefer curiosity ("You're going to want to see this"). The only way to know what works for your subscribers is to test.
When to Schedule Your Send
Timing affects open rates. Most ecommerce brands see best performance between 10am and 2pm on weekdays. Avoid Mondays (inbox overload) and Fridays (people mentally check out).
But your audience might be different. Check your Klaviyo analytics after a few sends to see when your opens peak. Use "Send Time Optimisation" in Klaviyo to automatically send emails when each recipient is most likely to engage.
Before you hit send, use the preview and test functions. Send test emails to multiple inboxes (Gmail, Outlook, Apple Mail) to see how your design renders. Check on mobile. Read through for typos. Nothing kills credibility faster than a broken link or misspelled product name.
Building Automated Flows in Klaviyo
This is where Klaviyo proves its value. Flows are automated email sequences triggered by specific customer behaviours. Someone signs up? Welcome flow. Someone abandons their cart? Recovery flow. Someone makes a purchase? Post-purchase flow.
These automated sequences run continuously in the background, generating revenue whilst you focus on other parts of your business. Set them up once, optimise them over time, and watch them consistently drive 30-40 percent of your total email revenue.
The Three Flows That Matter Most
You could build dozens of flows. Don't. Start with the three that generate the most revenue: welcome series, abandoned cart, and post-purchase.
The welcome series converts new subscribers into first-time customers. Welcome emails achieve open rates of 68.6 to 80 percent when they land in the primary inbox. That's your highest engagement window. Use it wisely.

The abandoned cart flow recovers lost sales. Someone adds products to their cart but doesn't complete checkout. Your flow reminds them, addresses common objections, and incentivises completion. Abandoned cart emails generate open rates of 40 to 45 percent and click-through rates of 21 percent.

The post-purchase flow drives repeat orders. First purchase is just the beginning. This sequence thanks customers, requests reviews, and recommends complementary products based on what they bought.
Building Your Welcome Series
Navigate to Flows > Create Flow > Create From Scratch. Name it "Welcome Series" and set the trigger to "Subscribed to List." This fires whenever someone joins your email list through any signup form.
Build a three-email sequence:
- Email 1 (immediate): Welcome and brand introduction with first-purchase discount
- Email 2 (2 days later): Social proof and best-selling products
- Email 3 (4 days later): Educational content or founder story to build connection
For email 1, keep the delay at zero. Send immediately whilst interest is highest. Include your discount code prominently, explain what makes your brand different, and make the call-to-action crystal clear.
Email 2 waits 48 hours. This gives recipients time to browse your site and consider that first purchase. Feature customer testimonials and showcase your most popular products. Social proof drives conversions.
Email 3 shifts from selling to storytelling. Share your brand origin, explain your values, or provide helpful content related to your products. This builds emotional connection and increases long-term customer value.
Setting Up Abandoned Cart Recovery
Create a new flow with the trigger "Checkout Started." Add a time delay filter: "Wait 4 hours." This prevents sending cart reminders to people who are still shopping or who completed their purchase through a different device.
Build a two-email sequence:
- Email 1 (4 hours after abandonment): Simple reminder with product images and checkout link
- Email 2 (24 hours after abandonment): Urgency element like limited stock or expiring discount
The first email addresses the most common abandonment reason: distraction. Life happens. They got interrupted. Your email brings them back with zero pressure, just a helpful reminder that their items are waiting.
The second email adds motivation. Mention limited stock if applicable. Offer free shipping if cart value is close to your free shipping threshold. Create gentle urgency without being pushy.
Add a conditional split before email 2: "If someone has placed an order since starting this flow, exit flow." This prevents sending cart reminders to people who already completed their purchase.
Building Post-Purchase Automation
Create a flow triggered by "Placed Order." Wait 1 day after purchase (gives time for delivery excitement), then send your first post-purchase email.
This three-email sequence focuses on retention:
- Email 1 (1 day post-purchase): Order confirmation and what to expect
- Email 2 (7 days post-purchase): How-to content or product care tips
- Email 3 (14 days post-purchase): Review request and complementary product recommendations
Email 1 reduces buyer's remorse. Confirm their purchase, set delivery expectations, and provide customer service contact information. Make them feel confident about their decision.
Email 2 increases product satisfaction. Share usage tips, care instructions, or creative ways to use what they bought. The more value they get from their purchase, the more likely they'll buy again.
Email 3 requests social proof and drives the second purchase. Ask for a review, then recommend products that complement their original order. Use Klaviyo's product recommendation blocks to automate these suggestions based on purchase history.
Flow TypeNumber of EmailsKey FocusWelcome Series3 emailsFirst purchase conversionAbandoned Cart2 emailsCart recovery and objection handlingPost-Purchase3 emailsRetention and repeat purchases
Designing Signup Forms to Grow Your List
Flows generate revenue, but they need subscribers to send to. Signup forms capture email addresses from your website visitors and feed your automated sequences.
Most brands overcomplicate this. They build elaborate pop-ups with multiple fields, complex offers, and confusing designs. Simpler converts better. Ask for email only. Make the value proposition clear. Remove friction.
Types of Signup Forms
Klaviyo offers four form types: pop-ups, flyouts, embedded forms, and full-page forms. Each serves a different purpose.
Pop-ups appear in the centre of the screen after a trigger (time delay, exit intent, scroll depth). They're highly visible but can annoy visitors if overused or poorly timed. Use them for your primary list-building offer.
Flyouts slide in from the bottom corner. They're less intrusive than pop-ups but still noticeable. Good for secondary offers or blog visitors who've already engaged with your content.
Embedded forms live directly in your page content. Place them in your footer, sidebar, or blog posts. They convert lower than pop-ups but never interrupt the browsing experience.
Full-page forms take over the entire screen. Reserve these for high-value offers like contest entries or exclusive waitlist signups.
Creating Your First Pop-Up Form
Navigate to Sign-Up Forms > Create Sign-Up Form > Pop-up. Choose a template or start from scratch. Keep the design simple: headline, one-sentence value proposition, email input field, submit button.
Your headline should promise a specific benefit. "Get 15% off your first order" outperforms "Join our newsletter" by a wide margin. People don't want newsletters. They want discounts, exclusive access, or valuable content.
Set your display trigger thoughtfully. "Time delay" of 30 seconds works for most sites. This gives visitors time to browse before interrupting them. "Exit intent" captures people about to leave. "Scroll depth" of 50 percent targets engaged visitors.
Add a close button. Always. Visitors should be able to dismiss the form easily. Forcing them to hunt for a tiny X creates frustration and damages brand perception.
Optimising Form Conversion Rates
Test your offer. A 10 percent discount might work better than free shipping, or vice versa. The only way to know is to run split tests.
Test your timing. Maybe 15 seconds performs better than 30 seconds for your audience. Or maybe exit intent captures more emails than time delay. Run A/B tests in Klaviyo's form builder.
Test your copy. Does "Exclusive Access" resonate more than "VIP Perks"? Does "Join 10,000+ happy customers" work better than no social proof? Test one element at a time.
Keep the form field minimal. Email only. Adding name fields reduces conversion rates by 20-30 percent. You can gather more information later through progressive profiling in your welcome series.
Mobile Optimisation Matters
Over 60 percent of ecommerce traffic comes from mobile devices. If your form doesn't work perfectly on mobile, you're losing the majority of potential subscribers.
Preview your form on mobile before publishing. Is the text readable? Are buttons large enough to tap easily? Does the form load quickly? Make sure the close button is obvious and easy to reach with a thumb.
Consider using a flyout instead of a pop-up on mobile. Full-screen pop-ups feel more intrusive on small screens. A flyout from the bottom is less disruptive and easier to dismiss.
Understanding Segments and Lists in Klaviyo
Lists and segments control who receives your emails. Understanding the difference between them determines whether you send relevant messages or blast everyone with generic content.
Lists are static groups. Someone subscribes to a list, and they stay on it unless they unsubscribe or you manually remove them. Use lists for different subscription sources (website pop-up, checkout signup, in-store capture).
Segments are dynamic groups based on conditions. Create rules like "purchased in the last 30 days" or "opened at least 2 emails in the last 90 days," and Klaviyo automatically adds or removes people as they meet those criteria. Use segments for targeted campaigns and flow filtering.
Building Your Core Segments
Start with these four essential segments:
Engaged Subscribers: Anyone who opened or clicked an email in the last 90 days, or made a purchase in the last 180 days. This becomes your primary sending audience for campaigns.
VIP Customers: Anyone who's placed 3+ orders or spent over £500 lifetime value. These are your most valuable customers. Give them early access, exclusive offers, and personalised attention.
At-Risk Customers: Anyone who made a purchase 120+ days ago but hasn't bought again. Target them with win-back campaigns before they churn completely.
New Subscribers: Anyone who joined your list in the last 14 days but hasn't purchased yet. Send additional nurture campaigns to this group whilst they're still highly engaged.
Creating a Segment
Navigate to Audience > Lists & Segments > Create List / Segment > Segment. Name your segment clearly. "Engaged Subscribers" is better than "Active Emails" because it's immediately obvious who's included.
Add your conditions. For engaged subscribers: "If someone has opened or clicked at least once in the last 90 days, OR placed an order at least once in the last 180 days."
Klaviyo uses "if someone" language for conditions. Each condition starts with that phrase, then you choose your criteria from dropdowns. Chain multiple conditions with AND/OR logic to create precise segments.
Save the segment. Klaviyo immediately calculates how many profiles match your conditions. This number updates automatically as people's behaviour changes. That's the power of dynamic segments.
When to Use Lists vs. Segments
Use lists when you need to permanently mark where someone came from. Create separate lists for website signups, checkout signups, and in-store captures. This lets you analyse which sources generate the most valuable subscribers.
Use segments when you need to target based on behaviour or attributes. Segments automatically update, so you don't have to manually maintain them. They're perfect for campaign targeting and flow filtering.
Can someone be on multiple lists? Yes. Can someone be in multiple segments? Yes. That's expected and normal. The same customer might be on your "Website Signup" list and in your "VIP Customers" segment simultaneously.
Making Your First 30 Days Count
You've got the foundation. Store integrated, domain authenticated, three core flows built, signup forms capturing subscribers. Now it's time to make these pieces work together and generate actual revenue.
One ecommerce case study documented a brand that generated £60,340 in email revenue within 30 days of launching their Klaviyo setup. That's not typical for every brand, but it shows what's possible when you prioritise the right activities.
Your Week-by-Week Action Plan
Week 1: Foundation and Integration
Complete your Shopify or ecommerce platform integration. Verify that customer data, product catalogue, and event tracking are working correctly. Authenticate your sender domain and begin the DNS propagation process.
Don't send anything yet. Use this week to ensure data flows correctly between your store and Klaviyo. Check a few customer profiles to confirm past purchases appear. Browse your own site whilst logged out to verify that Klaviyo's tracking pixel captures your activity.
Week 2: Core Flows and List Prep
Build your three essential flows: welcome series, abandoned cart, and post-purchase. Use the structures outlined earlier. Keep designs simple and copy focused on benefits.
Clean your existing email list. Remove unengaged contacts from the last year. Create your "Engaged Subscribers" segment. Set up your primary signup form with a clear offer.
Week 3: Warm-Up and Testing
Send your first campaign to your 100 most engaged subscribers. Keep it simple: announce that you're improving your email programme, share what they can expect, maybe include a small thank-you discount.
Monitor delivery metrics closely. Check your inbox placement. Gmail, Outlook, and Apple Mail should show your emails in the primary inbox, not promotions or spam. If you're landing in spam, pause sending and troubleshoot your authentication.
Place test orders to trigger your flows. Use different email addresses to enter your welcome series, abandon a cart, and complete a purchase. Verify that all flows fire correctly and display accurate product information.
Week 4: Scale and Optimise
Gradually increase your campaign sending. Week 3 was 100 subscribers. Week 4 should be 200-300. Continue this gradual ramp whilst monitoring your delivery metrics.
Check your flow performance. Navigate to Analytics > Flows in Klaviyo. Look at open rates, click rates, and most importantly, revenue per recipient. Which flow is generating the most value? Which emails in each flow perform best?
Make your first optimisations. If email 2 in your welcome series has a low open rate, test a different subject line. If your abandoned cart flow isn't converting, try adding a small discount in email 2.
Metrics That Actually Matter
Focus on three core metrics in your first 30 days:
Flow Revenue Per Recipient: This tells you how much money each automated email generates on average. For welcome series, aim for £2-5 per recipient. For abandoned cart, £5-10 per recipient. For post-purchase, £1-3 per recipient.
List Growth Rate: Track how many new subscribers you're adding weekly. A healthy ecommerce brand adds 2-5 percent of their total list size each week through organic signups.
Engaged Subscriber Percentage: What portion of your list opened or clicked in the last 90 days? Healthy lists maintain 30-40 percent engagement. Below 20 percent signals deliverability issues or poor content relevance.
Don't obsess over open rates. Yes, they matter, but they're easily manipulated by subject line tricks that don't drive revenue. Focus on conversion metrics: clicks to site, add-to-carts from email traffic, and purchases attributed to specific flows.
Common Mistakes to Avoid
Don't skip domain authentication. We've seen brands delay this because it seems technical. The result? Their emails land in spam, their flows don't generate revenue, and they blame Klaviyo instead of their setup.
Don't import your entire list and immediately send to everyone. This destroys your sender reputation before you've established positive signals. Start small, build gradually.
Don't build 10 flows in your first month. Three core flows generate 80 percent of automated revenue. Add complexity later, after these foundations are performing well.
Don't neglect mobile optimisation. Test every email on mobile devices before sending. Check your signup forms on phones. Over half your traffic will come from mobile.
Don't ignore your analytics. Check flow performance weekly. Look for patterns. Which emails get the most clicks? Which products are purchased most often from email traffic? Use this data to optimise.
What Happens After Day 30
By the end of your first month, you should see consistent revenue from your three core flows. Your welcome series converts new subscribers. Your abandoned cart flow recovers lost sales. Your post-purchase sequence drives repeat orders.
Now you can expand. Add a browse abandonment flow for visitors who view products but don't add to cart. Build a win-back sequence for customers who haven't purchased in 90 days. Create a sunset flow to clean unengaged subscribers from your list.
Develop more sophisticated segments based on purchase frequency, product preferences, and engagement patterns. Send targeted campaigns to specific customer groups instead of broadcasting to everyone.
Test aggressively. A/B testing conversion rate improvements can translate into 15 percent revenue increases. Subject lines, send times, email designs, offer types. Everything is a test opportunity.
Consider advanced flows like post-purchase cross-sell sequences, VIP customer appreciation series, or new product launch automation. But only after your core flows are humming along and generating consistent revenue.
Email subscribers typically have 2-3 times higher customer lifetime value than customers acquired through other channels. That makes email marketing your highest-leverage growth activity. The better you get at Klaviyo, the more valuable your customer relationships become.
Making Retention Inevitable
Klaviyo isn't just an email tool. It's a retention engine that runs in the background whilst you focus on growing your brand.
The brands that succeed with email marketing treat it as a system, not a tactic. They build the right flows in the right order. They clean their lists and warm their domains properly. They test continuously and optimise based on revenue data, not vanity metrics.
Your first 30 days set the foundation. Get the integration right. Build the three core flows that generate the most revenue. Grow your list through strategic signup forms. Start small with campaigns and scale gradually as your sender reputation builds.
The technical setup only takes a week if you follow the sequence outlined here. The next three weeks are about testing, learning, and optimising. By day 30, your automated flows should be generating consistent revenue with minimal ongoing effort.
That's when email marketing shifts from a task to an asset. Your flows run 24/7, converting subscribers whilst you sleep. Your campaigns reach engaged segments with targeted offers. Your list grows organically through forms strategically placed across your site.
This tutorial gave you the straight path from zero to revenue. No fluff, no feature creep, just the core activities that move the needle. Now go build it.